

The sand between pavers serves as far more than simple filler material. This critical component determines the stability, longevity, and overall performance of any paver installation, from driveways to patios. Whether you're planning a new hardscape project or maintaining existing pavers in Central Florida's unique climate, understanding jointing materials transforms ordinary outdoor surfaces into durable, low-maintenance spaces that withstand heavy traffic, intense sun, and seasonal weather patterns.
Understanding the Role of Joint Sand
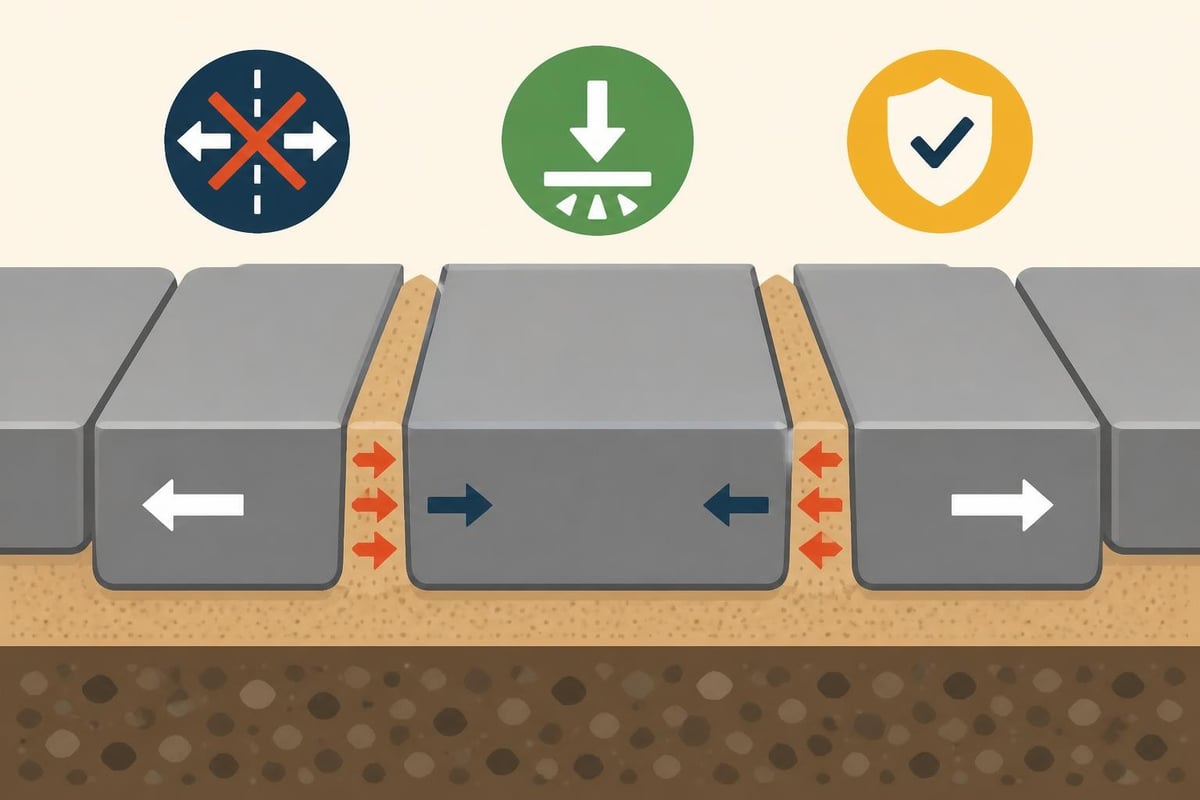
The sand between pavers functions as the binding agent that keeps individual stones locked in position. When properly installed, this material prevents lateral movement, distributes weight evenly across the surface, and creates a cohesive unit that resists settling and shifting over time.
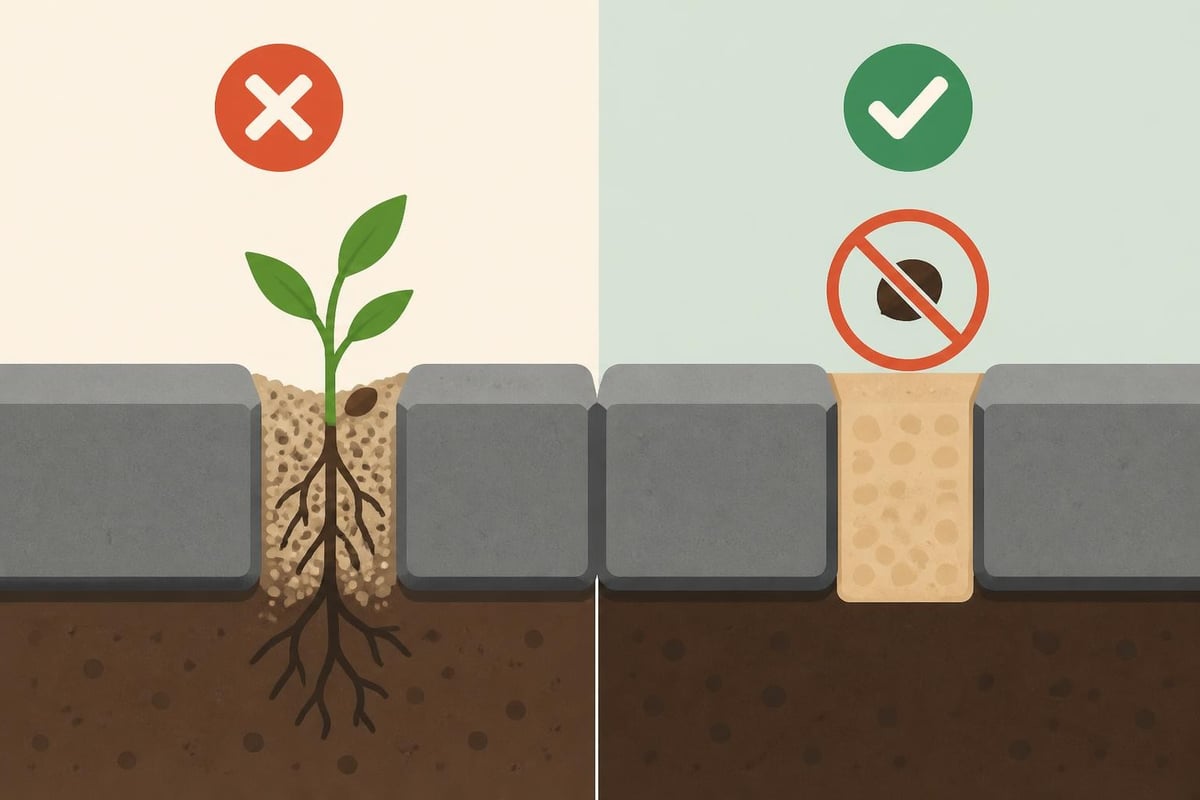
Beyond structural support, joint sand acts as a barrier against common paver problems. It blocks weed growth by filling spaces that would otherwise accumulate soil and seeds. The material also facilitates drainage by allowing water to percolate through joints rather than pooling on the surface, which is particularly important in Florida's rainy season when proper water management prevents erosion and foundation damage.
How Joint Sand Stabilizes Paver Systems
Interlocking pavers rely on friction and compression to maintain their position. Sand fills the narrow gaps between stones, creating resistance that prevents individual pavers from rocking or moving independently. This interlocking effect becomes stronger over time as the material settles and compacts through foot traffic and natural settling.
The depth of sand penetration matters significantly. Joints should be filled to within approximately one-eighth inch from the top of the paver surface. Overfilling prevents proper drainage and can lead to sand washing onto the paver face, while underfilling compromises stability and allows excessive movement.
Types of Sand for Paver Joints
Regular Masonry Sand
Traditional masonry sand represents the most basic option for filling joints. This fine-grained material compacts well and costs less than specialized alternatives. However, regular sand presents significant limitations that make it unsuitable for long-term paver installations.
The primary drawback involves washout. Rain and irrigation quickly erode regular sand from joints, requiring frequent reapplication. This material also fails to prevent weed growth effectively, as seeds easily germinate in the loose, nutrient-friendly environment. Ants and other insects frequently colonize joints filled with regular sand, creating mounds and destabilizing the paver surface.
Polymeric Sand
Polymeric sand revolutionized paver maintenance when it entered the market. This specialized product combines fine sand particles with polymer additives that activate when exposed to water. The polymers bind sand grains together, creating a semi-rigid joint that resists erosion, inhibits weed growth, and deters insect colonization.
Key advantages of polymeric sand include:
- Water-activated binding creates permanent joint stabilization
- Prevents weed seeds from establishing roots
- Resists washout during heavy rain events
- Deters ants and other burrowing insects
- Available in various colors to match paver tones
- Reduces maintenance frequency significantly
The installation process requires careful attention to detail. Proper application of polymeric sand involves sweeping dry material into clean joints, removing excess from paver surfaces completely, then misting with water to activate the binding agents without over-saturating.
Alliance Gator Dust and Premium Options
Professional-grade jointing materials like Alliance Gator Dust represent the premium tier of paver sand products. These advanced formulations offer superior binding strength, faster curing times, and enhanced resistance to erosion compared to standard polymeric sand.
Premium products typically feature:
| Feature | Standard Polymeric | Premium Alliance Products |
|---|---|---|
| Binding Strength | Moderate | High |
| Weed Prevention | Good | Excellent |
| Washout Resistance | Good | Superior |
| Joint Flexibility | Limited | Enhanced |
| Longevity | 3-5 years | 7-10 years |
| Price Point | $$ | $$$ |
Installation Process for New Paver Projects
Base Preparation Requirements
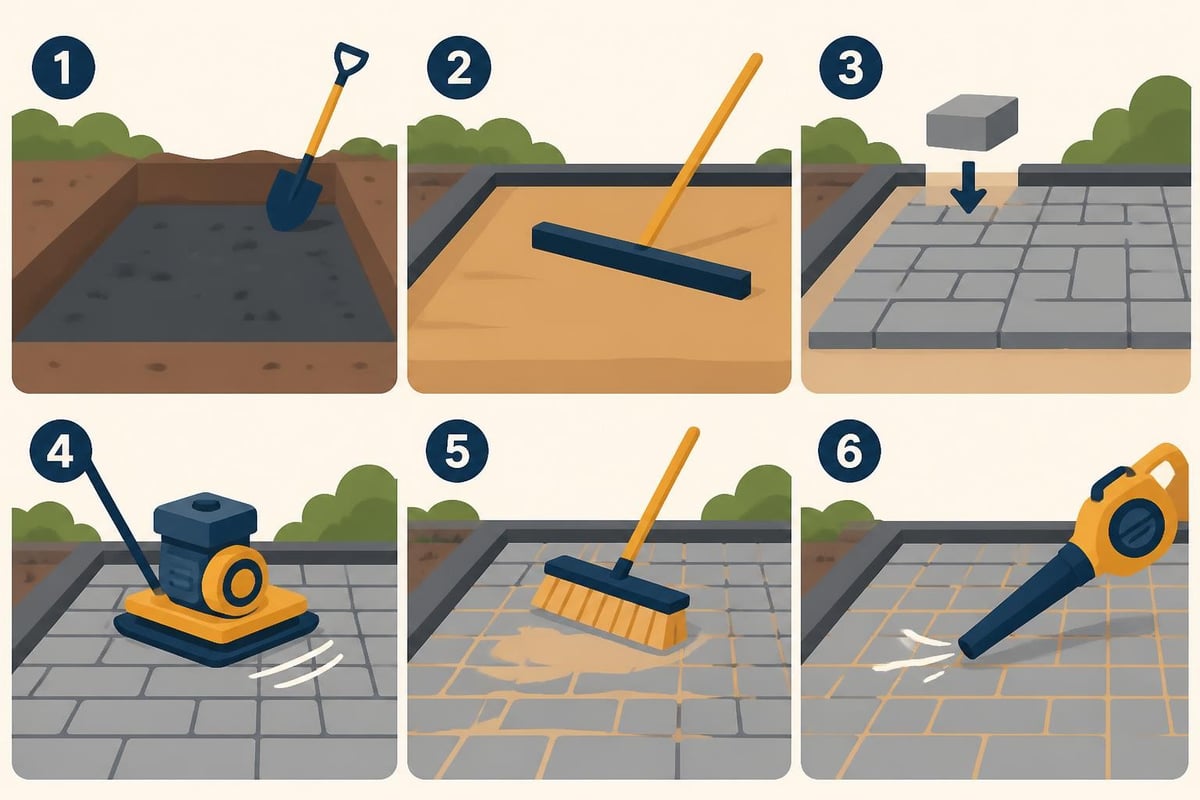
Proper sand between pavers begins long before jointing material gets applied. The foundation determines whether joints remain stable or fail prematurely. Leveling sand creates the smooth, even surface that pavers rest upon, directly influencing final appearance and performance.
The base typically consists of compacted aggregate topped with a one-inch layer of bedding sand. This sand layer must be screeded perfectly level to ensure uniform paver height and proper drainage slopes. Many installers mistake this bedding sand for joint sand, but these materials serve completely different purposes and require different specifications.
Setting and Compacting Pavers
Once pavers are positioned on the prepared base, a plate compactor vibrates the stones into the bedding sand below. This mechanical compaction seats pavers firmly and creates the slight variations in height that the sand between pavers will later fill and stabilize.
Professional installers make multiple passes with the compactor, checking levels frequently. The goal involves achieving a smooth, even surface with joints that maintain consistent width throughout the installation. Most quality paver installations feature joints between one-eighth and one-quarter inch wide, providing adequate space for jointing material while maintaining visual appeal.
Filling Joints: Step-by-Step Application
Surface Preparation
The process of adding sand between pavers requires completely dry conditions. Moisture on paver surfaces or within joints causes polymeric products to activate prematurely, creating a hazy residue that proves difficult to remove. Schedule jointing work during dry weather with no rain forecast for at least 24 hours.
Clean all debris, dust, and construction residue from the paver surface before applying jointing material. Power washing and allowing adequate drying time ensures optimal results. Some contractors wait several days after installation before applying jointing sand, giving the base time to settle and compact naturally.
Application Techniques
- Pour sand across the paver surface in manageable sections rather than attempting to fill the entire project at once
- Sweep material diagonally across joints using a stiff-bristled broom to work sand deep into gaps
- Make multiple passes from different angles to ensure complete joint penetration
- Add more material as initial applications settle into joints
- Remove all excess from paver surfaces using a soft brush or leaf blower
The sweeping technique matters considerably. Aggressive scrubbing damages paver edges, while insufficient effort leaves joints partially filled. A methodical approach with steady pressure achieves consistent results across the entire surface.
Activation and Curing
After thoroughly removing excess material, polymeric sand requires controlled water application to activate binding agents. A fine mist works best, saturating joints without creating runoff that washes material from gaps. The sand between pavers should appear darkened and wet but not pooling or flowing.
Curing times vary by product and weather conditions. Most polymeric sands reach foot traffic readiness within 24 hours, though full curing may require several days. During this period, avoid disturbing the surface or introducing moisture beyond the initial activation watering.
Maintenance and Re-Sanding Procedures
When to Re-Sand Existing Pavers
Even properly installed jointing material eventually degrades. Central Florida's intense UV exposure, heavy seasonal rains, and temperature fluctuations accelerate deterioration. Signs that pavers need re-sanding include visible joint erosion, increased weed growth, paver movement when walked upon, and ant mound formation between stones.
Professional paver restoration and maintenance addresses these issues comprehensively, combining joint refilling with cleaning and sealing for maximum protection and longevity. This integrated approach prevents minor problems from escalating into major structural failures.
Re-Sanding Preparation
The re-sanding process begins with removing existing deteriorated material from joints. Pressure washing effectively clears old sand while simultaneously cleaning paver surfaces. For severely compacted or polymeric sand, specialized tools may be required to excavate joints completely.
Critical preparation steps include:
- Power wash at appropriate pressure (2000-3000 PSI) to clean joints and surfaces
- Remove all vegetation, roots, and organic debris
- Allow complete drying for 24-48 hours minimum
- Inspect for damaged pavers requiring replacement
- Level any settled or uneven areas before proceeding
Application for Restoration Projects
Restoration re-sanding follows the same basic process as new installations, with additional attention to joint cleanliness and depth. Older paver installations may have settled unevenly, creating joints of varying width that require careful material management to achieve consistent fill levels.
Some restoration projects benefit from edge restraint reinforcement before re-sanding. Hardscape services that include structural repairs ensure the foundation remains sound before cosmetic improvements like re-sanding take place.
Climate Considerations for Central Florida
Managing Heat and UV Exposure
Florida's intense sunlight degrades certain jointing materials faster than in northern climates. Polymeric sand containing UV inhibitors resists breakdown from constant sun exposure, maintaining binding properties longer than standard formulations. Dark-colored sand absorbs more heat, which accelerates polymer degradation in full-sun installations.
Summer surface temperatures on pavers can exceed 150 degrees Fahrenheit, affecting how jointing materials cure and perform. Installation timing matters – early morning or late afternoon application during cooler periods produces better results than midday work in peak heat.
Rainfall and Drainage Challenges
Central Florida receives approximately 50 inches of annual rainfall, much of it concentrated in intense afternoon thunderstorms. This precipitation pattern tests jointing materials differently than regions with gentle, consistent rain. The sand between pavers must withstand sudden deluges without washing away while still allowing water to drain through joints efficiently.
Proper drainage slopes built into the paver base become critical for joint longevity. Standing water accelerates material breakdown and creates conditions favorable for organic growth. Professional installations incorporate subtle grading that directs water away from structures while maintaining aesthetic appeal.
Preventing Common Joint Problems
Weed Control Strategies
Preventing weeds between pavers starts with complete joint filling using quality polymeric sand. The hardened surface created by activated polymers blocks light and prevents seed germination. However, organic debris accumulating on top of joints can provide a growth medium for opportunistic plants.
Regular maintenance prevents weed establishment:
- Sweep paver surfaces monthly to remove organic debris
- Address small weed sprouts immediately before roots establish
- Avoid using organic mulches directly adjacent to paver edges
- Ensure sprinkler systems don't constantly saturate joint areas
- Consider pre-emergent herbicides for severe weed pressure
Ant and Insect Deterrence
Fire ants and other insects view regular sand joints as ideal nesting locations. Once established, colonies excavate sand and create unstable areas that compromise paver installations. Polymeric sand effectively deters these pests by creating an inhospitable environment too hard for tunneling.
Existing ant problems require treatment before re-sanding. Insecticide applications eliminate colonies, then proper jointing material prevents re-infestation. The hardened surface of polymeric joints forces insects to seek softer soil elsewhere.
Material Selection Guide
Choosing the Right Product
The appropriate sand between pavers depends on multiple factors including traffic levels, climate exposure, budget constraints, and aesthetic preferences. Understanding sand types helps homeowners and contractors make informed decisions that balance performance with cost.
Selection criteria to consider:
- Traffic volume: High-traffic areas benefit from premium polymeric products
- Sun exposure: UV-resistant formulations last longer in full-sun locations
- Joint width: Wider joints may require coarser products for proper filling
- Color matching: Select sand tones that complement or contrast paver colors
- Maintenance commitment: Premium products reduce long-term maintenance needs
Color Coordination Options
Modern jointing materials come in various colors beyond natural tan. Gray, black, brown, and even custom tones allow designers to create specific visual effects. Contrasting joint colors make individual pavers stand out, while matching tones create a seamless, unified appearance.
In Central Florida's bright sunlight, lighter joint colors stay cooler and may prove more comfortable for barefoot traffic around pools. Darker colors absorb heat but can create dramatic visual effects that enhance architectural styles common in the region.
| Joint Color | Best Applications | Visual Effect |
|---|---|---|
| Tan/Natural | Traditional patios, walkways | Neutral, versatile |
| Gray | Modern designs, concrete pavers | Contemporary, clean |
| Black | Contrast with light pavers | Bold, dramatic |
| Brown | Rustic, natural stone look | Warm, organic |
Professional vs. DIY Installation
Skill Requirements
Installing sand between pavers appears straightforward, yet achieving professional results requires experience and attention to detail. Common DIY mistakes include incomplete surface cleaning before application, insufficient joint filling, premature water activation, and inadequate excess removal. These errors lead to hazy residue, weak joints, and premature failure.
Proper installation techniques ensure materials perform as designed. Professionals understand how weather conditions affect application, which tools produce optimal results, and how to troubleshoot problems during installation. The relatively small cost difference between DIY and professional installation often makes hiring experienced contractors worthwhile.
Tools and Equipment
Successful jointing requires specific tools:
- Stiff-bristled push broom for working material into joints
- Soft brush or leaf blower for removing excess
- Garden hose with fine mist nozzle for activation
- Knee pads for comfortable working position
- Safety glasses and dust mask for health protection
Professional contractors also use plate compactors, joint cleaning tools, and commercial-grade application equipment that speeds work and improves consistency. For large projects spanning hundreds or thousands of square feet, equipment access becomes essential for timely completion.
Long-Term Performance and Warranty
Expected Lifespan
Quality polymeric sand installations typically last five to ten years before requiring renewal, though actual longevity varies based on traffic, climate, and maintenance. Regular sand needs replacement annually or even more frequently in high-rainfall areas. The superior performance of polymeric products justifies higher initial costs through extended service life and reduced maintenance.
Sealed paver installations protect both stone surfaces and joint materials from degradation. Penetrating sealers bond with paver surfaces and sand between pavers, creating additional weather resistance and color enhancement. Many paver restoration projects combine re-sanding with sealing for comprehensive surface renewal.
Maintenance Schedules
Proactive maintenance extends the life of jointing materials significantly:
- Monthly: Sweep surfaces to remove debris
- Quarterly: Inspect joints for erosion or damage
- Annually: Power wash and address minor problems
- Every 5-7 years: Plan for complete re-sanding
- Every 2-3 years: Consider resealing if applicable
Central Florida homeowners should adjust these schedules based on specific site conditions. Properties with mature tree canopy may require more frequent debris removal, while full-sun locations need earlier UV damage assessment.
Troubleshooting Joint Failures
Identifying Problems Early
Visual inspection reveals most joint issues before they become severe. Look for sand erosion that exposes joint depths beyond one-quarter inch, weed growth emerging from gaps, paver movement when walked upon, and material discoloration indicating biological growth.
Early intervention prevents minor problems from requiring complete restoration. Spot-filling small eroded areas costs little and takes minimal time compared to comprehensive re-sanding projects. Keep extra jointing material on hand for quick repairs as needed.
Repair Strategies
When joints fail in isolated areas, targeted repairs often suffice. Clean the affected section thoroughly, remove deteriorated material completely, and refill using the same product type as the original installation. Matching materials ensures consistent appearance and performance across the entire surface.
Widespread joint failure typically indicates underlying issues requiring professional assessment. Foundation settlement, inadequate base preparation, or drainage problems may be causing premature material degradation. Addressing root causes prevents repeated failures and wasted repair efforts.
Selecting and maintaining the right sand between pavers protects your hardscape investment while ensuring years of beautiful, functional outdoor space. Whether you're planning new paver installation or restoring existing surfaces, professional expertise makes the difference between adequate results and outstanding performance. Pink Palm Pavers brings licensed, insured craftsmanship to every project across Central Florida, from initial design through long-term maintenance, backed by our comprehensive two-year warranty and family-owned commitment to quality.

